
How to Score and Slip Clay (Step-by-Step Guide for Beginners)
If you’ve ever tried attaching two pieces of clay—like adding a handle to a mug or joining coils—you’ve probably heard the phrase “score and slip.”
This simple technique is one of the most important skills in pottery. Done correctly, it creates strong, durable joins. Done incorrectly… your piece may crack, separate, or fall apart.
In this guide, we’ll walk through exactly how to score and slip clay step by step so your pieces stay together.
What Does “Score and Slip” Mean?
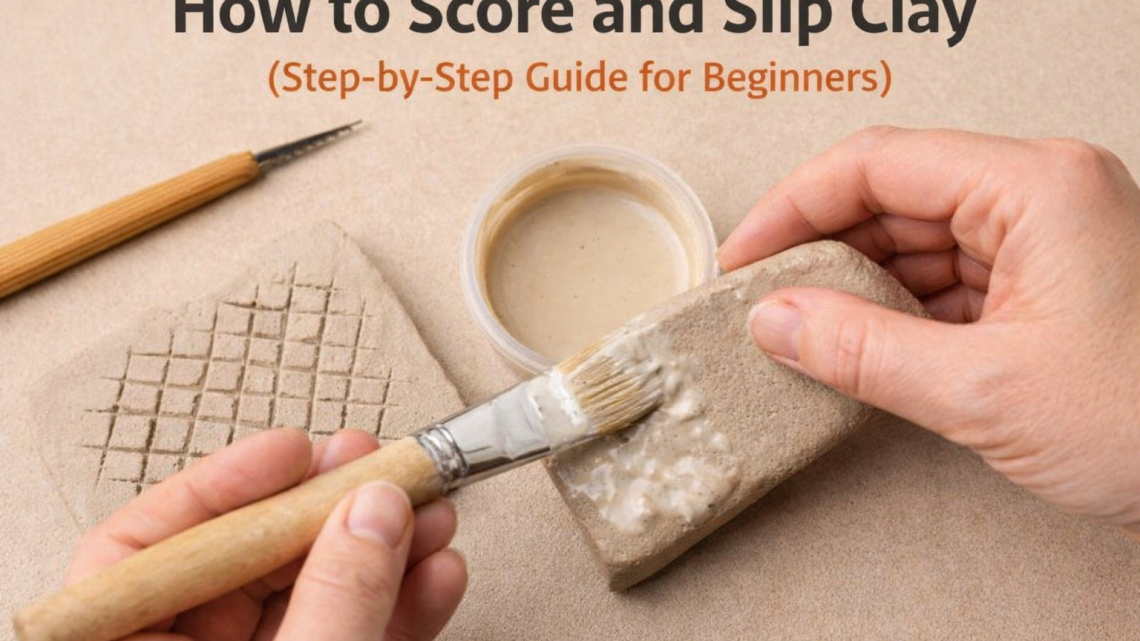
Scoring means scratching the surface of the clay where two pieces will connect.
Slip is a mixture of clay and water that acts like glue between those surfaces.
Together, they create both:
- a mechanical bond (from the scratches)
- and a chemical bond (from the slip)
If you want a deeper explanation of the terminology, you can also read our guide on what score and slip mean in pottery:
👉 Slip Slurry Score A beginner guide
How to Score and Slip Clay (Step-by-Step)
1. Score both surfaces
Use a needle tool, fork, or serrated rib to scratch lines into both pieces of clay where they will connect.
The goal is to create texture so the slip has something to grab onto.
2. Apply slip
Brush or dab slip onto the scored areas. Make sure it fills in the grooves.
Slip should be thick enough to stay in place—not watery.
3. Press the pieces together
Firmly press the two pieces together so the slip and scoring interlock.
You should feel the connection “grab.”
4. Blend the seam
Use your finger, a rib, or a wooden tool to smooth the seam.
This step strengthens the joint and improves the finished look.
5. Reinforce if needed
For heavier pieces (like handles), add a small coil of clay over the seam and blend it in.
This adds extra strength and helps prevent cracking.
Common Mistakes to Avoid
Even beginners can get great results by avoiding these common issues:
- Not scoring enough
- Using water instead of slip
- Joining clay that’s too wet or too dry
- Not compressing the seam
- Skipping reinforcement on heavy pieces
Small mistakes here can lead to big problems later—especially during firing.
What Tools Do You Need?
You don’t need much to get started. Many potters use simple tools like:
- Needle tools
- Serrated ribs
- Forks
- Loop tools
As you continue working with clay, having dedicated tools can make the process faster and more consistent.
When Should You Use Score and Slip?
You should use this technique anytime you are attaching clay pieces, including:
- Adding handles to mugs
- Joining coils in hand-building
- Attaching decorative elements
- Building sculptures
If you want your piece to last, score and slip is essential.
Final Thoughts
Learning how to score and slip clay is one of the first big milestones in pottery.
It may seem like a small step, but it makes a huge difference in the strength and success of your work.
Once you get comfortable with it, you’ll notice fewer cracks, stronger joins, and better overall results.
And that’s when pottery really starts to feel fun.
Looking for clay to start your next project? See where to buy pottery clay in Arizona.